
- Introduction
- Images
- Machine Learning on MNist dataset
- Real world image classification problems
- Understanding real-world images
- Learning visual features for Machine Learning
- Introducing Convolution Neural Network
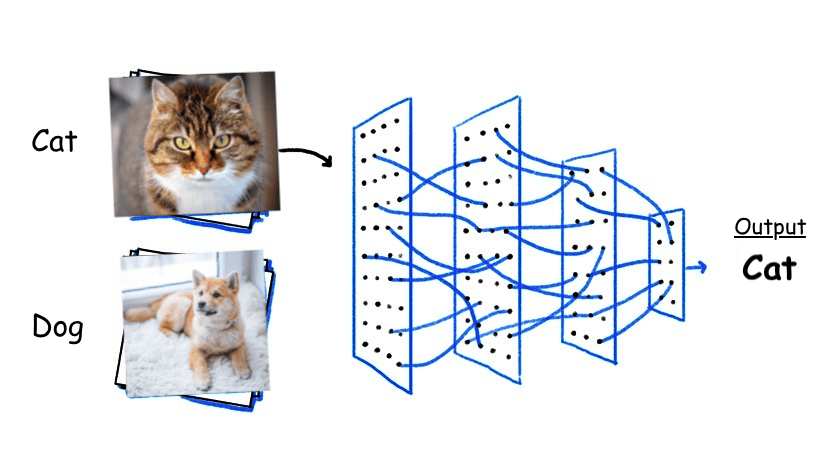
- Architecture of CNN
- CNN in practise
- Pre-trained Models
- Limitation of using CNN
Introduction
The original work of this blog was done years back in a slide presentation for demo. It never made it to this blog site until now. On a sleepy Sunday afternoon; I finally decided to bring this presentation as my technical write-up.
In the world of machine learning and AI, Image classification is the most researched and implemented field of study. One of the pioneer application of image classification is that of Tesla auto-pilot AI feature; where it uses multiple sensors (recent plan is to dump the sensors altogether) and steaming images from the street to detect objects (pretty amazing).
Assuming you have a basic understanding of Machine Learning and also neural networks, i will try to cover some of the fundamental concepts regarding Images and how to train the a machine learning model for images. This blog doesn’t deep dive into the algorithms but provides a high level view of the basic concepts.
Images
From a computer system perspective, images are just numbers. Images are a combination of binary numbers ranging from 0 to 255. Every pixel square of the images have a number attached to it.

What gives images color are the color channels of Red, Blue and Green. These are the 3 fundamental building blocks of any color. Each of these channels will have its own number range.
Machine Learning on MNist dataset
Now, let us try to see an example of MNist image dataset which is a collection of handwritten images. It is arguably the most famous image dataset which the researchers had used to understand and build machine learning models in the past.

MNist dataset consists of handwritten digits images from 0 to 9. Every image in the handwritten digit is 28×28 pixel dimension (height x width). There is only 1 color scheme applied which in Gray.
Now, if we are building a machine learning model, the images needs to be flattened into a single array of numbers. For a 28×28 dimension image, a flattened array will be of size 784.

While training the flattened MNist dataset, two Feed-forward Neural networks were applied with the desired output to be 10 (for the 10 digits). The activation layer is set to ReLU and the final activation is done using Softmax which generates the probability of labels between 0-9.
The test/train model accuracy is provided below which is a net accuracy of 97% on the test data.

The code base for the above training of MNist dataset is provided in the github link.
Real world image classification problems
The problem with the MNist dataset is that it doesn’t represent the real world scenario. Images in the real world doesn’t have fixed dimension or in black/white color scale. Below are highlights of some of the key challenges of real-world images:

Understanding real-world images
If we look closely, real world images have certain high level features. For example; If we see an images with features like eyes, nose, mouth, hair, etc. we can safely say that it is a picture of a person. The same would go for a house, car, road, and basically any objects.

Also there is a challenge involved with features of an image. There are problems related to viewpoint, scale, deformation, illumination conditions, background, etc. For example; a person could be of different size or an image could be taken in a low light vs. taken during a sunny day.

So, it becomes equally challenging to learn the visual features of an image.
Learning visual features for Machine Learning
In order for computers to learn the features of an image without destroying the spatial information, a technique of filter kernels is applied. This kernel is applied by sliding across the image by one step.

This process of applying multiple filters across the image is known as Convolution. The technique of convolution is applied across to extract the features without destroying the spatial information of the images.
An image kernel is a small matrix used to apply effects like the ones you might find in Photoshop or Gimp, such as blurring, sharpening, outlining or embossing.

In the above image, a filter kernel matrix of 3×3 size is applied on an image of 5×5 dimension. The resulting image is a feature map of 3×3 dimension. It was a simple matrix multiplication and addition.
There are many different type of image kernels like blur kernel, sharpen kernel, etc. If we apply the image kernel on a real world image, it would be look something as below:

A real world image of a person when applied with two different kernels resulting in one with outline (edge) image and one with sharpen kernel.
You can also try applying a image kernels on images at setosa.io
Introducing Convolution Neural Network

Subscribe to continue reading
Subscribe to get access to the rest of this post and other subscriber-only content.
