- 👋Introduction
- 🚀High-Level Architecture of Pentaho Carte
- 🎡Spinning up Carte Cluster
- 🟢Carte Server API List
- 🚉Submitting Pentaho Jobs & Transformations to the Carte Server
- ⚽Additional Useful Carte API Curl Commands
- 📚Recommended Pentaho Books
- 🤓Pentaho Enterprise Expert Support
👋Introduction
Pentaho Data Integration and Analytics is a cloud-agnostic and on-premise low-code data integration and visualisation platform. It belongs to the newly released Pentaho+ Data Platform by Hitachi Vantara. In this blog post, I will discuss on Pentaho Carte and explain how to work with it.
Pentaho Carte, unlike the traditional Pentaho Spoon, is a simple web server that allows you to run transformations and jobs remotely. It receives XML (using a small servlet) that contains the transformation to run and the execution configuration. It allows you to remotely monitor, start and stop the transformations and jobs that run on the Carte server.
Pentaho Carte is designed to be extremely performant and scalable with cloud computing in mind. The initialisation of the server parameters and configurations is pre-loaded in Pentaho Carte, which makes it easy for the jobs to get loaded fast and executed in a performant manner. With this in mind, let us explore further on Pentaho Carte.
🚀High-Level Architecture of Pentaho Carte

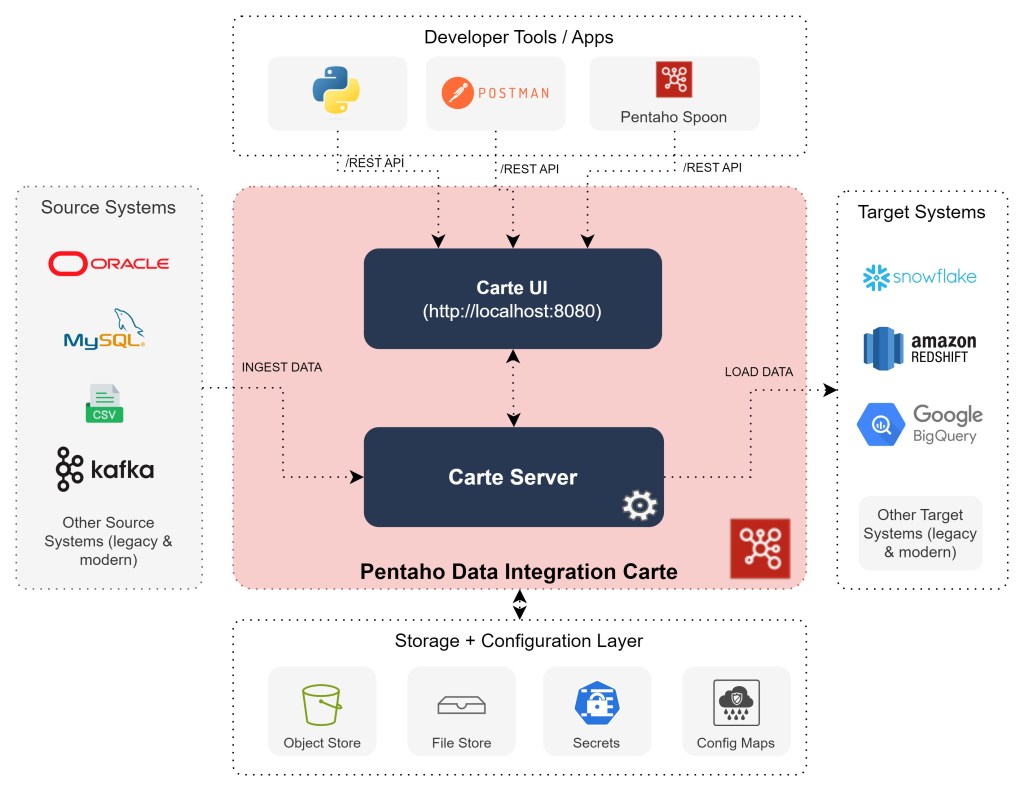
At a high level, Pentaho Carte is a light weight version of the Pentaho Data Integration server. It primarily consists of two high-level components: Carte Server and Carte User Interface.
The Pentaho DI Carte Server is the engine behind all the processing of the data. All of the data processing right from copying the data from source systems to transforming and loading it to the target systems. Pentaho comes with built-in connectors to easily connect your data source systems and load them to your data warehouse or any target systems. The Carte User Interface is a light-weight web interface that allows users to visualize the Pentaho Jobs / Transformations execution status and logs. Due to the light-weight nature of the Pentaho Carte server, it is very easy to scale carte servers either on Kubernetes, Docker or Cloud services.
🎡Spinning up Carte Cluster
A Carte cluster consists of two or more Carte slave servers and a Carte master server. When you run a transformation, the different parts of it are distributed across Carte slave server nodes for processing, while the Carte master server node tracks the progress. There are two types of Carte clusters: Static Cluster and Dynamic Cluster.
Static cluster has a fixed schema that specifies one master node and two or more slave nodes. In a static cluster, you specify the nodes in a cluster at design-time, before you run the transformation or job. Dynamic Cluster has multiple slave carte servers. However, it needs to be controlled via one master server.
Pre-requisite
- Download your latest Pentaho data integration (PDI version 9.x or higher) from the official Hitachi Vantara site on to your local desktop (MAC/PC).
- Unzip the downloaded Pentaho file and save it.
- Install the Pentaho license if you are an Enterprise customer or on an cloud environment.
- For Pentaho DockMaker installation, refer to the Hitachi Vantara Official documentation.
- Install docker and docker-compose (only if you are using docker to spin up carte server).
Using Command Line
Spinning up a simple static carte server is straight forward. Navigate to the data-integration directory and execute the carte.sh (in Mac/Unix) or Carte.bat (in Windows).
# change directory to the di server
cd ~./pdi-ee-client-<Version>/data-integration

# execute carte.sh by providing a hostname and port
sh carte.sh <Host name> <Port>
Here, <version> is the Pentaho version you have downloaded. e.g. : pdi-ee-client-9.5.0.0-240. <Host name> is the IP address of the system or DNS name /localhost (default).
You can also manually spin up multiple carte server on the same host-name with a different port numbers; for example as below:
# spinning up two carte server on ports: 8080 and 8081
sh carte.sh localhost 8080
sh carte.sh localhost 8081
Using Containers (Docker)
Docker is an open-source software platform which allows fast build, testing and deployment of all services required to run an application. It makes it possible by containerising each service in its isolated self-sustaining environment with all required parameters set for their operation, all within their container.
Pentaho Enterprise Edition comes with a docker helper utility: DockMaker to enable easier containerisation of Pentaho Data Integration images. This is a very simple utility that can bundle and spin up Pentaho docker images.
Assuming you have a Pentaho DockMaker installed in your system, you can execute the below command to generate the necessary docker files to spin up the carte server:
# Prepare a Carte server
DockMaker -T carte -V <Version>/<Service Pack Version>/ee -U –user cluster –password cluster –-EULA-ACCEPT=true
Here, <version> is the Pentaho version e.g. 9.5.0.0 and <service pack version> is the service pack release number (usually 3 digit number) attached with the file download e.g. 243.
Once, the dock-maker command generates the docker commands, you will notice a directory /generatedfiles created. You can execute the below command to spin up and down the carte cluster.
# spin up the carte server (in docker)
docker compose -f generatedFiles/docker-compose.yml up -d

# spin down the carte server (in docker)
docker compose -f generatedFiles/docker-compose.yml down
Spinning up multiple Carte Server in Docker
If you want to spin multiple servers, you need to modify the generatedFiles/docker-compose.yml file services definition to include the number of replicas required and the range of Port numbers. Refer to this answer in Stack-Overflow to give you an idea.
Once the docker-compose.yml file has been modified, run the below command to spin up multiple carte server in docker.
# spin up 3 carte servers
docker compose -f generatedFiles/docker-compose.yml up -d --scale=3
Additional Carte Configuration
If you want to have more control over the configuration of the carte servers, you can create an XML configuration file named: slave-config.xml. Modify the necessary bits and spin up the carte server.
<slave_config>
    <slaveserver>
        <name>Your Carte Server Name</name>
        <hostname>YourHostName or localhost</hostname>
        <port>8082</port>
        <username>cluster</username>
        <password>cluster</password>
        <master>N</master>

        <!-- (optional) if SSL is required or enabled -->
        <sslConfig/>
          <keyStore>keystore file location</keyStore>
          <keyStorePassword>changeit</keyStorePassword>
          <keyPassword>changeit</keyPassword>
        </sslConfig>
    </slaveserver>
</slave_config>
Next, use this file to trigger the carte server as:
sh carte.sh slave-config.xml
Accessing Carte via UI
Since the Carte server comes with a lightweight web interface, it can be easily viewed via any web browser. Assuming a carte server is available on your local system (localhost) at port (8080), enter the below URL in your browser:
http://localhost:8080/kettle/status/
Enter the username and password of the carte cluster to access the UI. Default username is cluster and password is cluster.
A sample view of the carte server will look as below:

Read More about setting up Pentaho Carte Cluster from the Official documentation.
🟢Carte Server API List
The biggest advantage of using a Pentaho Carte Server is the availability of REST API endpoints. These endpoints enables developers and third-party applications or services to work seamlessly with the Pentaho Servers. The endpoints provision (not limited to) users with the ability to monitor the health and performance of the carte servers, execute Pentaho jobs and transformations, monitor Pentaho jobs and transformations, etc.
The following official documentation holds the list of API endpoints that are available:
- Pentaho Carte Server API List for monitoring carte server
- Pentaho Carte Server API List for Pentaho Jobs
- Pentaho Carte Server API List for Pentaho Transformations
It is difficult to explain all of the APIs in one blog post. I would suggest following the official documentation to understand the specific APIs you would require in your project. However, I will explain the most used and perhaps the most useful endpoint – Executing Jobs and Transformation on carte servers using REST API.
🚉Submitting Pentaho Jobs & Transformations to the Carte Server
Using Pentaho Spoon
The de-facto standard for developers to build Pentaho jobs and transformations is to use the Pentaho Spoon. The process for submitting jobs and transformations to the Carte Server is the same. No special configuration is required here.
For submitting and executing Pentaho Jobs via Spoon to the Carte Server, you would need to first open Pentaho Spoon and set up a slave server. Put down the details of your Pentaho Carte server (along with username and password).

Step-1 Flow: Navigate to the Pentaho Spoon View Section > Transformation 1 (or Job 1) > Slave server > right click and add new > Enter the details of the carte server > press OK.
Next, we need to set the Run Configurations. This enables the users to select the Run Options when executing the jobs/transformations. With this step, you have a carte run configuration ready to be used.

Step-2 Flow: In the Run Configurations > Right click and select New > Enter the name and description of the Run Configuration > Select Engine to “Pentaho” > Select Settings to “Slave Server” > Select Location to “Carte Server” from the drop down. This is the same carte server you defined in Step-1.
Finally, for running the Pentaho jobs or transformations, select the necessary Run Configuration from the drop-down. This will submit the job to the Carte server for execution. You can then monitor the execution in the Spoon terminal or on the Carte User Interface.

Step-3 Flow: Select Run option for running the Job or Transformation > In the window select Run Configuration as “Pentaho Carte” or any Run Configuration mentioned in step-2 > Monitor the execution of the job in Spoon or Carte UI.
Using CURL Command

Subscribe to continue reading
Subscribe to get access to the rest of this post and other subscriber-only content.
